

Before you start posting content on your blog, we’ll set up your social media accounts. Then we’ll install both share and follow buttons on your website. That way from day one, your readers can easily share your content and start following you.
Social share buttons allow readers to share your content on their social media accounts.
Social follow buttons link out to your social media accounts where readers can follow your actual profile page.
So just to clarify, there are two tasks to complete.
- Set up your social media accounts on your preferred networks and have a set of social media buttons, that link readers directly to your social media accounts
- Set up social media sharing buttons so your readers can easily share your content (these buttons are not the same as the buttons that send people to your social media accounts)
You’re setting up a few accounts in this tutorial so I recommend having a at least a couple of hours on your hands so you don’t feel rushed. Get your password spreadsheet ready!
Don’t worry about uploading images and creating bios and all that stuff just yet. Today, we’re making sure you get hold of your blog name for the social media platforms you want and get set up on WordPress correctly.
Step 1: Set Up Your Social Media Accounts
The first thing we are going to do is set up your social media accounts. If you completed the Name Your Blog tutorial, you will have a list of the social media platforms you intend to be on.
You can check availability of your favourite name on over 500 popular social networks using knowem.com.
In this tutorial, we’ll just cover Facebook, Google Plus, Pinterest and Twitter. You don’t have use these particular networks and you don’t have to set up a million social media accounts, just pick the ones where your future readers hang out and that will work best for you and your niche.
You can create a Facebook page for your WordPress website here. Select the “Brand or Product” option and then select “websites” from the drop down menu. Add your brand name and click on “Get Started” to create your Facebook fan page profile. If you don’t have a Facebook account start here.
Once you have created your page, find your Facebook URL by clicking on your page. Your Facebook URL will look something like this. We’ll need it in the next step.
https://www.facebook.com/Your-Blog-289086521429609/
Once you have reached 25 “likes” you can claim your own unique Facebook URL. See more here…
Google Plus
You can create a Google Plus brand page for your website here by clicking on the link for the page creation portal. Google only requires one username and password for all Google applications so you can sign with your gmail password.
If you don’t have a Google account already, create a new Google account.
Your Google Plus URL will look something like this:
https://plus.google.com/b/111796679929201739073/111796679929201739073
To find your Google Plus URL, click on your profile icon in the top right corner and then Manage Account. Then click on View General Account Info. Next click on Your Personal Info, then Manage Settings and then Profile (I know, there’s got to be a quicker way – if you find it let me know!). The URL here is your Google Plus URL. Make a note of this, we’ll be using it shortly.
You can apply for a custom Google Plus URL once you achieve the following:
- You have ten or more followers (people who have added you to their circles)
- Your account is at least 30 days old
- Your profile has a profile photo
- Your account is in good standing
Learn more here…
Head over to Pinterest and create an account for your business website. Click here for instructions on how to set up a Pinterest Business Account.
You will need to enter an email address for your blog. If you haven’t created a custom email address for your website, I recommend setting one up with Google’s G Suite.
Check out my tutorial here where I explain why.
If you don’t have the budget for G Suite just yet ($5 per month), don’t worry – there’s a free option. See my tutorial on setting up a custom email address for your blog for FREE plus how to access your emails via your Gmail account.
You can decide what your Pinterest URL will look like such as pinterest.com/yourblog. You have a maximum number of 15 characters. Starting Smart Online was too long, I’ve going with pinterest.com/startingsmart.
Note down your URL.
Go to Twitter. Sign up for a new account, following the prompts. You will be asked to type in your name (20 characters max) and your username (15 characters max).
What you choose here will show up on your Twitter page looking something like Sarah Pilati@StartingSmartOL.
Now grab the URL for your page, for example: https://twitter.com/StartingSmartOL.
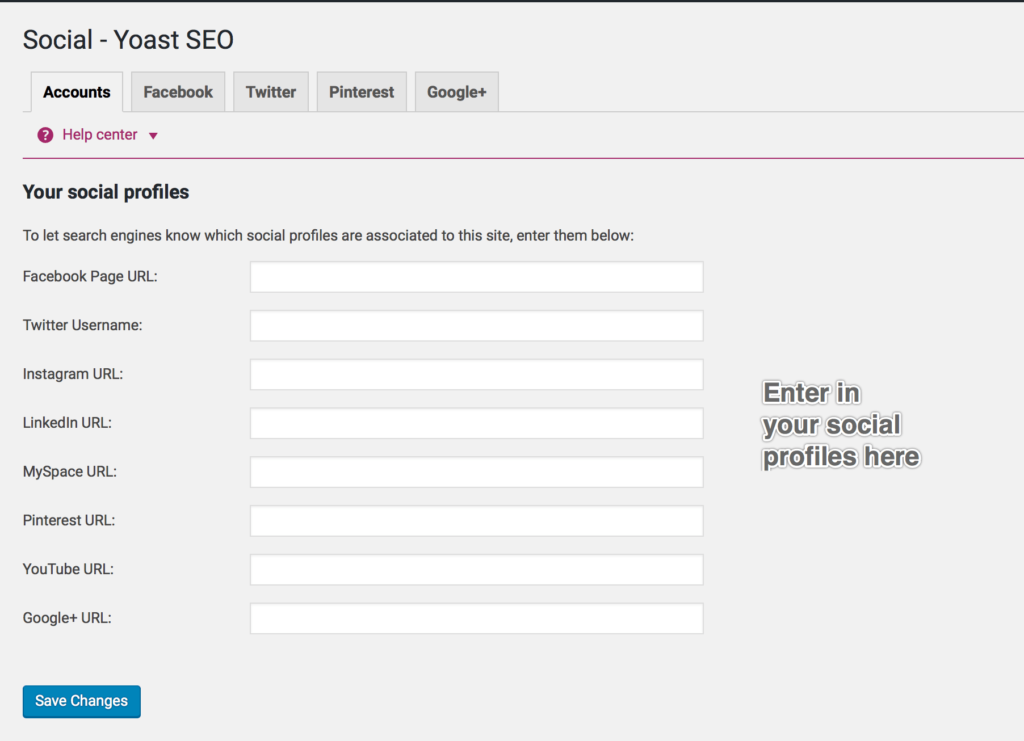
One Quick Extra Step: Set up Social on Yoast SEO
For those following the Starting Smart Online tutorials, you previously installed the Yoast SEO plugin to perform a number of tasks. The plugin can also be used to determine how your site will be shown to social networks like Facebook and Twitter plus tell Google about your social profiles.
In your WordPress dashboard click on SEO>>Social and simply enter the social profile URLs you have just created and click on Save Changes.
Step 2: Install the Monarch Plugin by Elegant Themes (Premium)
Like everything with WordPress, there’s free and then there’s paid. I’ll cover off the Elegant Themes premium plugin first for the hard core SSO students, following these tutorials step by step.
So, Elegant Theme members with the Developer Plan, you guys can download the Monarch Plugin. This is one of the best plugins you can get for this job! Halleluiah.
I you are still unsure which theme to choose, head this way to learn why Divi is an awesome option for you!
To purchase the Monarch plugin, join Elegant Themes here. (ps. affiliate link:))

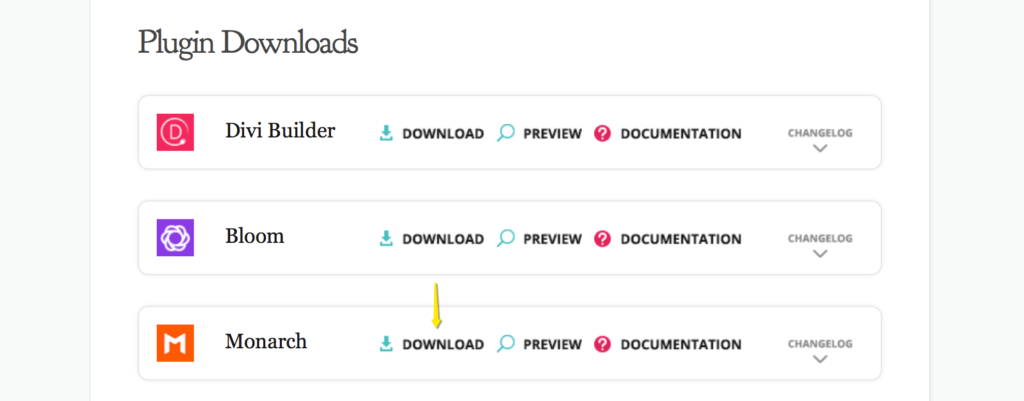
Log in to your Elegant Themes account and in the Members Area you’ll see Plugin Downloads.
Download the Monarch plugin. Click on Plugin Package.
The plugin will now be sent to your downloads folder (or wherever your downloads go).
You may need to create a zip file if the theme was downloaded in a folder format.
To create a zip file for uploading to your WordPress dashboard, right click on the folder in your downloads area (or wherever your downloaded files are stored) and “compress” the file.
You should now see a file named Monarch.zip.
Now in your WordPress dashboard, select Plugins and then click on the Add New button.
Now select the Upload Plugin button. Select Choose File and then select the file named Monarch.zip.
Once installed you can Activate the plugin.
Free WordPress Plugins for Sharing & Following
Here are a two popular free WordPress plugins you can use that have BOTH social share buttons and social follow buttons:
Social Sharing: Set Up Social Media Sharing Buttons on Your Website
Now make your way back to the WordPress dashboard and go to Tools>>Monarch Settings.
The first heading is Social Sharing and under that you will see the menu option Locations, Networks, Sidebar, Inline, Pop Up, Fly In and On Media.
Choose Where Your Buttons Will Go
Click on the first option, Locations. This is where you can choose where you want your social sharing buttons to appear. You can choose multiple options if you like. Save changes.
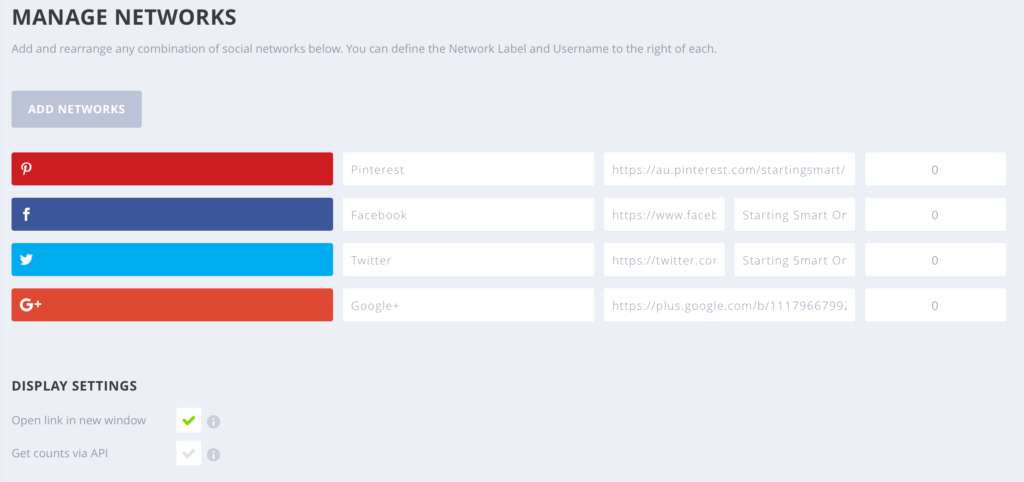
Add Networks Your Readers Can Share To
Next click on Networks. Click on Add Networks and select the networks you want your readers to be able to share to and then Apply. Save changes.
Match Your Buttons to Your Brand
The next four options, Inline, Pop Up, Fly In and On Media, are where you configure the settings for your chosen locations. For example, if you have only chosen to show social share buttons on your side bar, you only need to configure the Sidebar settings.
Let’s configure the Sidebar settings as an example.
Choose Icon Style gives you options for how you want the social share buttons to make an entrance on your website. Select your favourite transition.
At Choose Icon Shape select the shape you would like your buttons to be.
Display Settings is self-explanatory. For new blogs, I suggest entering a Minimum Count Display if you want the number of counts to show.
At Color Settings you can change the color of your buttons to match your brand.
At Post Type Settings you can decide where you want your social share buttons to appear on your website. If you’re not sure, for now just tick “post”. Save changes.
If you selected to have your social share buttons appear in more than one place on your website, make sure you have completed the settings for each location.
You’ll probably change your mind later, you can always come back and experiment with what works best.
Social Following: Link your Social Media Accounts to Your Website
At the same place in the WordPress dashboard go to Tools>>Monarch Settings and you will see the Social Follow option.
This is where you add all your new social media account details and configure your social follow button settings.
At the first option, Networks enter the new account profiles you set up in the first step.
The column showing the name of the network is how the network will appear next to your buttons. For example, the Google + Icon will appear with the word “Google +” underneath. You may override this to “Google Plus” or something else if you choose. If you don’t want any word to appear, under the Widgets tab, deselect the Display Networks Names.
Next, enter in your URLs. Leave the number of followers at zero for now. Save Changes.
Next click on Widget below, where you can select your configuration settings as you did for the social share buttons. Save Changes.
With the social share buttons, you selected the location from various options such as Fly-In or On Media. With the social follow buttons their positioning is determined a different way.
The social follow buttons can appear in what’s called a widgetised area. This might be your sidebar or your footer.
In your dashboard, click on Appearance>>Widgets and drag the Monarch Follow widget into your Sidebar or Footer Area.

Phew, that’s it for today folks! Great job.
If you’re a sucker for punishment, click on the red button below and keep going!!!


AUTHOR: SARAH PILATI Hi, I’m Sarah! I’m here to help you create your first WordPress blog. I cover the early stages of your project – getting your website up and running! If you have any doubts you can do it yourself, this website is for you! You can get started here.


0 Comments