

This post contains affiliate links to products I use and love. Thanks for supporting me.
So you’re just about to launch your blog and business. I bet your excited! I bet you’re also feeling a little nervous having never done it before. All totally normal!
A little word of advice – don’t worry about having everything perfect. If you do, you’ll never launch.
In this post, I want to talk about the things you can do to prepare for launch so you get your blog off to a successful start.
I’m assuming you’ve set your website up already? If not, head this way for my step by step tutorials on setting up a WordPress blog.
Have you set up any business tools for your blog yet? I’ve listed the must have business tools you can set up before you launch. I recommend working through the list before starting on your pre-launch preparation.
Here is the list:
- Self-Hosted Blogging Platform
- Premium Theme
- Search Engine Optimisation – Yoast SEO Plugin
- Social Media Accounts and Social Share & Social Follow Buttons
- Professional Email Address
- Google Analytics
- Website Security
- Website Backup
Most steps simply require you to install a plugin and my tutorials have you covered.
OK, so in this post, I’ll cover some of the content that you can create pre-launch, your branding and what you need to do make your website visible to the public and tell search engines your open for business!
1# The Content You Need to Launch
You don’t need a lot of content to launch your blog. The most importing thing, is that what you do have, is good quality content. Here is what I recommend you start with at the minimum.
Blog posts
You can launch your blog with just one post. You can launch with 10. This is up to you, but there is no reason not to launch your first post if you’ve done all your pre-launch preparation. Having said, make sure your post is epic. That means 1000 words minimum, 3000 is awesome. 300 is a sad face. Include images, make sure your paragraphs are broken up nicely and you have plenty of headings. Bullet points and lists are great. Use the Yoast SEO plugin to check your readability and include the metadata so search engines will like your blog.
About page
I believe it’s a good idea to have an About page ready for your launch. If anything, writing your About page will make sure you have truly clarified your purpose and story. Check out my guide for creating an About page. I’ve also included some awesome and diverse About page examples for you to draw inspiration from.
Legal
I’m no expert when it comes to the Legal side of things, but it’s highly likely you will need a Privacy Policy. I recommended the blog Jade&Oak for info on “being legal”.
Affiliate Disclosure
If you have any affiliate links or intend to have affiliate links, make sure you have your affiliate disclosure in place.
2# Create a Brand
Some of you may have already developed a brand for yourself and your business. Others may still be unsure what your brand will look like.
Branding is not all about the visual elements of your business. It’s about your purpose and your story. Hopefully when choosing your topic, you clarified:
- Who you help
- What you are helping them with and
- How you are helping them
For more info on this, check out my post on choosing a niche.
On the visual side of branding, of course, the best case scenario is that you have your colors, fonts, graphics templates, logo and favicon already designed and all your files neatly nested in your Finder folder.
But…for most of you that’s simply not the case.
You might find, once you launch your blog it takes you weeks or months before you truly work out what your brand will be. Yesterday you liked pink. Today you like blue!
It’s OK, to choose the organic route. That said, you don’t want to be chopping and changing forever so give yourself a deadline. Three months max – there I’ve given you one!
If you need help working out your brand’s design, here are some helpful tools.
Finding a WordPress Theme
If you’ve seen a website you like, providing it’s on WordPress, you can use WordPress Theme Detector to discover what theme it is. This is how I first discovered the Divi theme by Elegant Themes.
There are millions of themes to choose from. If you want a professional looking website you absolutely need to invest in a premium theme. You can find a theme in the WordPress theme gallery under the Premium tab. ThemeForest is another popular marketplace for WordPress themes. Many premium themes can be purchased directly from the theme company’s website.
To learn more about what you should expect from a theme and how you can find out if it’s the right one for your website, click on the button below.
Two of the most popular WordPress themes are Divi by Elegant Themes (this website uses Divi) and child themes by StudioPress that use the Genesis framework.

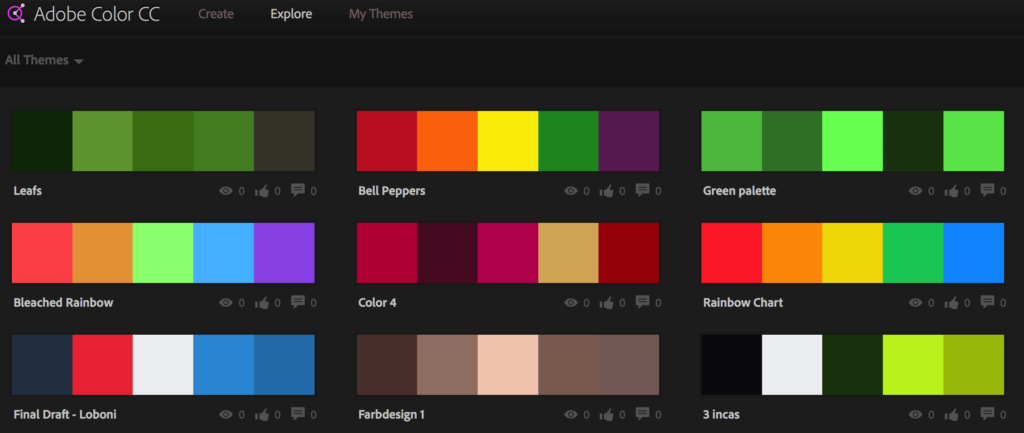
Color
I recommend choosing three to five colors for your website. Adobe Color CC is great for finding professional color combinations. Although..confession, I randomly selected my four colors (which changed a few times) over a couple of months – probably not the best way to go about it. So I’d love your feedback on my selection! (good or bad).
If you’ve seen a color you like on another website, you can use the Google Chrome extension ColorZilla to find out what it is!
Fonts
For fonts, you will be limited by the theme you choose. I recommend the Divi theme by Elegant Themes which has a great selection of fonts.
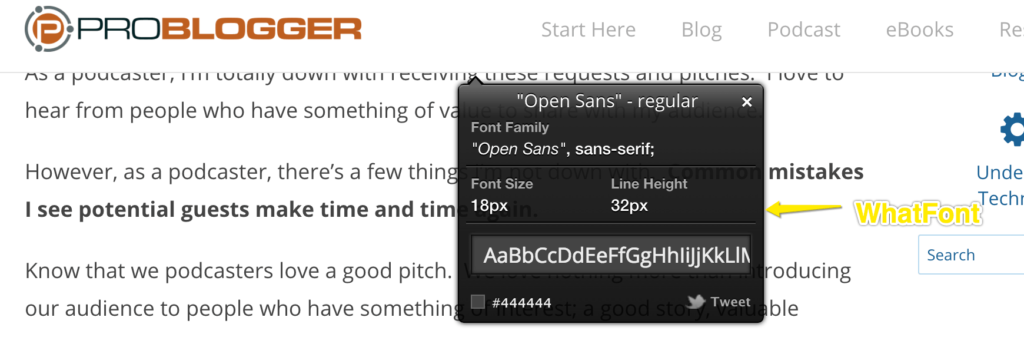
If you’ve seen a font you like on another website, you can use the Google Chrome What Font browser extension to find out what it is.
You can always purchase premium fonts from places like MyFonts and install them on your website.
With fonts, you’ll also need to think about how you want the text to appear. For example, I use the Open Sans font on Divi. I couldn’t decide on the font size or line height so I found another website that used Open Sans and looked good (problogger.com). I used the WhatFont extension for find out the line height, color and size of the font and went with those specs (plagiarism?…naahhh. Inspiration!) .
Creating Graphics
Canva is the best place to create graphics for beginner bloggers. You will love it. If you want to up the ante you can spend money subscribing to Adobe for tools like Indesign, Illustrator and Photoshop. But aside from the cost, just learning how to use these tools will take time.
Canva is free although you can upgrade to a premium account, which you might need to do to create transparent background files for say a logo or favicon. You get a free trial of the premium version so you can still create them for free.
It’s so fun to use. Even my 5 year old son, thinks spending five minutes on Canva creating colourful designs is the best thing ever!
Your other option is to take your idea to fiverr.com or 99designs.com and outsource the job.
Make sure you have a good design brief and know what you are looking for. I spent $300 outsourcing my logo design and because I wasn’t clear on what I wanted, I didn’t end up with a logo I liked. My brief was too vague – totally my mistake.
The other mistake I made was not showing anyone the logo for comment. When I did, after I purchased it, the reaction was consistent. A straight up “I don’t like it!”.
This was the one I choose for lack of a better option. Do you agree, it doesn’t not match my brand?

Anyway, enough about me, here is a worksheet you can download to help you plan your blogs brand and style. I find this worksheet super handy. I keep it on my desk and always refer to it.

3# Create a Sitemap
A sitemap (also referred to as an XML sitemap) is an important document that you submit to search engines when you are ready to launch your blog.
The sitemap is a list of the URLS (links of posts, pages etc) on your website that can be accessed by others and is used by search engines to read and understand your website.
4# Tell Search Engines About Your Blog
Once you have created your sitemap, the next step is to submit your sitemap to the search engines Google, Bing and Yahoo. In doing so, you are officially telling the world your website is open for business! Click below for my full tutorial on how to do this.
5# Link Google Analytics with Google Search Console
This step is a bit of housekeeping – getting everything in good order! Hopefully you already have Google Analytics set up and in the previous step (telling search engines about your blog) you set up the Google Search Console. Google Search Console is a free tool that allows you to monitor and maintain your site’s presence in Google Search results.
Well, if you link the two together they can talk to each other. What happens then, is when you are looking at your website analytics in Google Analytics you gain access to additional reports within your Analytics account giving you greater visibility into keyword related data.
Click on the button below for instructions on how to do this.
6# Collect Emails
Ideally, you want to have the capability to collect emails from day one.
But…if it’s all too overwhelming, that’s totally OK. The world is not going to come to an end if you haven’t set up your email opt in forms yet. However, this should be on the top of your priority list, if you are launching without it.
To collect emails, you need two things: a form on your website and an email service provider.
Opt-In Form
An opt-in form is a form on your website where visitors can provide specific details such as name and email address. For Divi users, if you have the Developer Plan you have access to the Bloom Email Opt-In plugin.

Check out this video to see what Bloom can do!
Another popular email opt-in option is OptinMonster.
Email Service Provider
In addition to a form on your website, you will also need an email service provider to collect the information that is input into the form fields.
I use Convertkit which is specifically designed for bloggers by bloggers. The plan starts at $29 per month for under 1,000 subscribers. There are loads of companies to choose from such as MailChimp, Aweber and Infusionsoft ($$$).
*Landing Pages and Leadboxes
I’m not including landing pages and leadboxes in “the content you need to launch” because I don’t want this to stop you launching and generate more procrastination BUT…I want to take a minute to talk about both because I think they’re important and a feature a professional blog should have.
A landing page is a page that is designed to get the reader to take some sort of action. A landing page is simple in design and content– generally free from logos, menus, social media icons and other visually distracting elements. Landing pages are purely designed to get a person to focus on one thing – taking action.
A leadbox is a pop up opt-in form that appears when a visitor clicks on a link, button, menu option or image on your website (so it’s actually a double opt-in).
Want to see this stuff in action?
If you want to see an example of a leadbox and landing page, click on the image below, sign up to Starting Smart Online to access my Starter Pack (which is a library) and you’ll be taken to a landing page which is my thank you page.

Pretty nifty? Don’t worry you can unsubscribe straight way. The email you receive will have an unsubscribe option – this is mandatory by the way.
I created the leadbox and landing page with the landing page software, Leadpages. Leadpages is a premium software but well worth it. Pricing starts at $25 a month.
If you want to create a landing page on your website for free, the Divi theme has pre-built landing pages you can use. I recommend only purchasing a theme with multiple prebuilt layouts like Divi so you don’t have to design them yourself. Your other option is to install a free landing page plugin.
You can use leadboxes and landing pages to promote all sorts of stuff – products, services, free downloadables, content upgrades such as checklists, planners, worksheets etc.
7# Monetisation Strategy
You can also start planning your blog’s strategy for making money! Click here to learn how you can monetize your blog. I have a worksheet you can download to help you plot and plan!
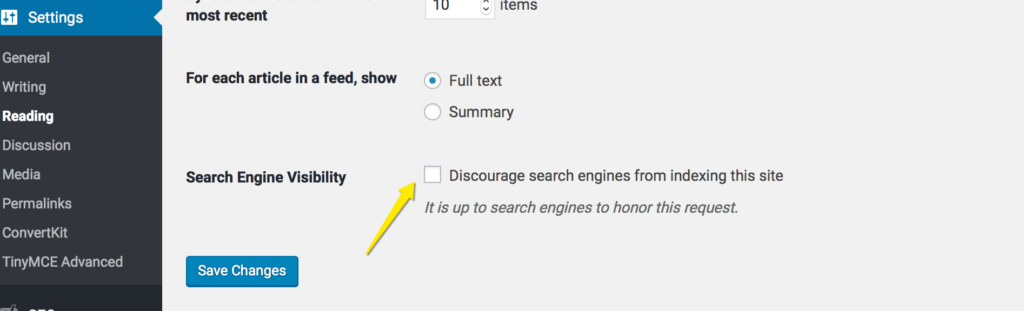
Blasts OFF
Now to “open up” your website go to your WordPress dashboard and click on Settings and then Reading and uncheck the box next to Search Engine Visibility. We do not want to discourage search engines from indexing this site.
So that’s my list! Phew…there’s a lot to do right?
Before you go, I think you’ll find my list of Tools & Resources very helpful. It’s a full list of everything you need to start and grow your blog. Including Video Creation, Color Tools and Advertising Partners.
I hope this list helps. If you liked this post, please share!
I’d love to hear how you go with your launch. Leave me a comment so we can chat!


AUTHOR: SARAH PILATI Hi, I’m Sarah! I’m here to help you create your first WordPress blog. I cover the early stages of your project – getting your website up and running! If you have any doubts you can do it yourself, this website is for you! You can get started here.
0 Comments