
Welcome to my grand tour of the WordPress dashboard! In the previous tutorial, I took you through the Settings menu option in the dashboard. As it’s packed with sub menu options, I thought it deserved it’s own post.
So got you cuppa ready? Let’s get to it!
First, make sure you are logged into to your WordPress website. To enter the WordPress Admin dashboard of your website, go to:
www.yourwebsite.com/wp-admin
Enter the WordPress username and password that you received from your web host provider following the installation of WordPress. Or you new password if you changed it.
To enter the dashboard, hover your mouse over the website name in the top left hand corner and in the drop-down menu click on Dashboard.
If your website name is not appearing in the top left corner, head back to the previous tutorial, and follow the instructions at General Settings.
Now, we’ll run through the following menu options: Posts, Media, Pages, Comments, Appearance, Plugins, Users & Tools.
Posts
A blog post is like a journal entry and will appear on your blog in reverse chronological order and listed by date (btw you can set up your posts to hide the date).
How your front page appears, is determined in the Settings menu on the dashboard, at the sub menu Reading. Your front page can be set as a static page or set to show your latest posts.
I talk a lot about the Divi theme in these tutorials (because it’s awesome!). So I use this theme in my examples. This also shows you what Divi can do.
If you’re following my tutorials we’ve already discussed Divi’s awesomeness, and we’ll be installing the theme in the next tutorial. So hang ten.
Here is one of the great features of this theme. The Divi page builder allows you to create a static home page and insert a blog module anywhere on the page giving you greater flexibility with the page layout.
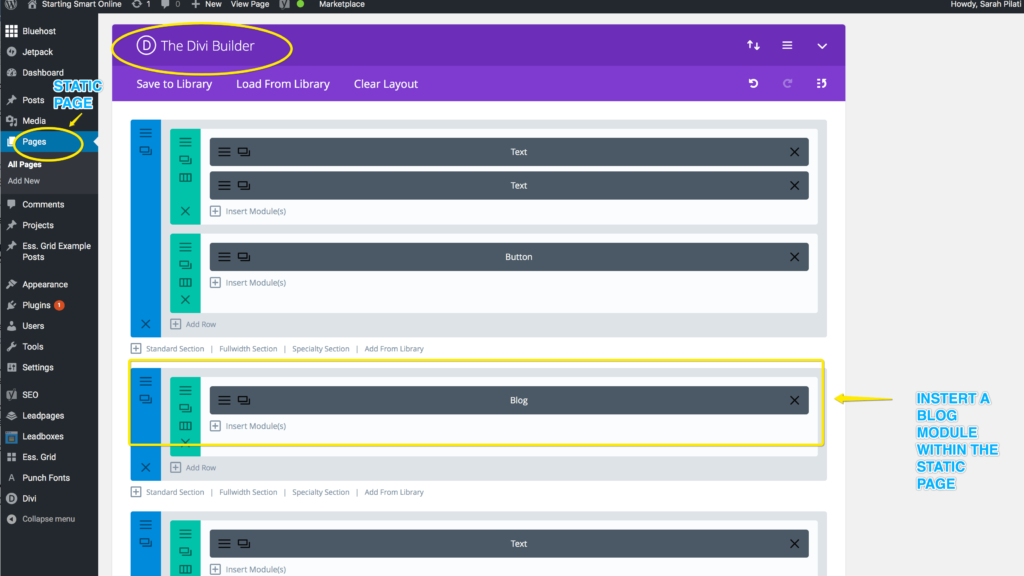
Now hover over Posts in the dashboard and four sub menu options appear – All Posts, Add New, Categories and Tags.
All Posts
This is where all your blog posts are displayed. You can see the categories and tags you have assigned to each post, the number of comments and the published date. Once you install the Yoast SEO plugin, you will also see a column for SEO and Readability.
If you hover over the Post Title, you will see the option to Edit, Quick Edit, Delete or View.
Add New
This is where you create a blog post! The top white bar is where you insert your blog post title. The large area of white space below is where you enter your content.
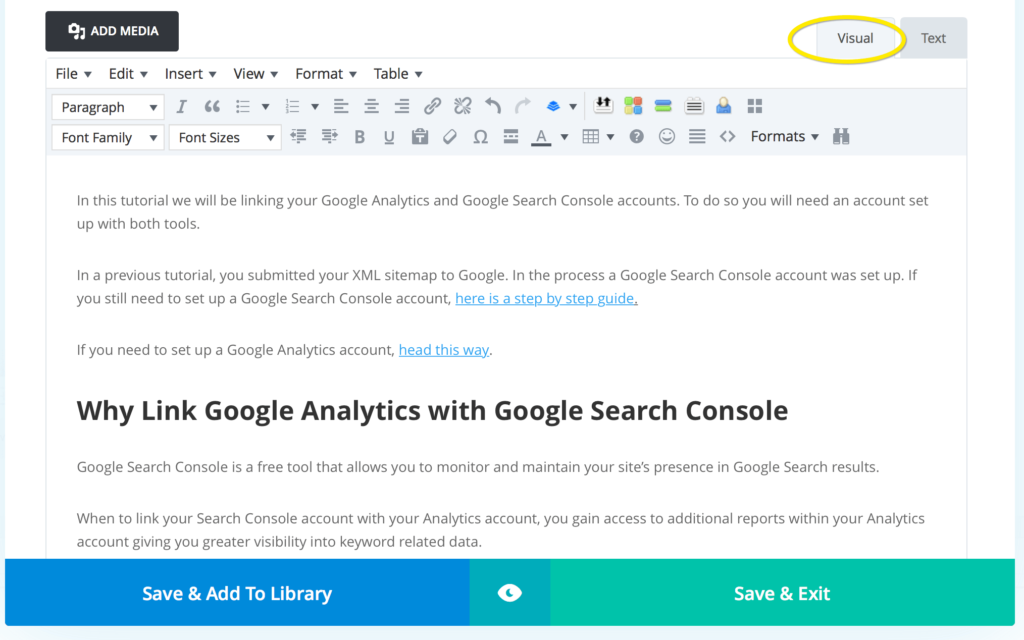
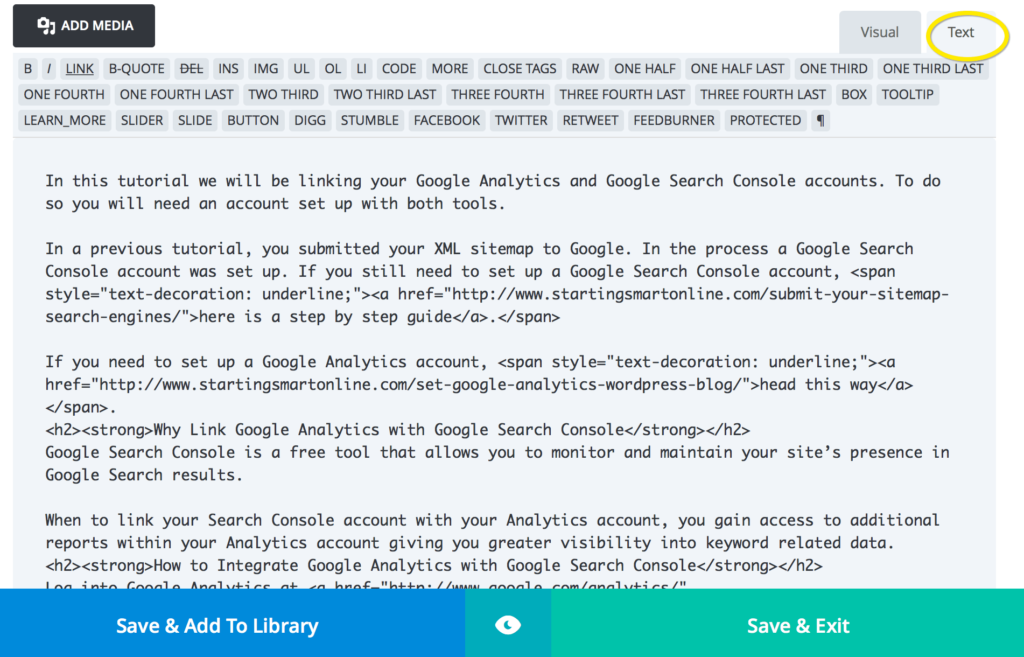
You’ll notice to the top right corner of the white space, there is two tabs, Visual and Text.
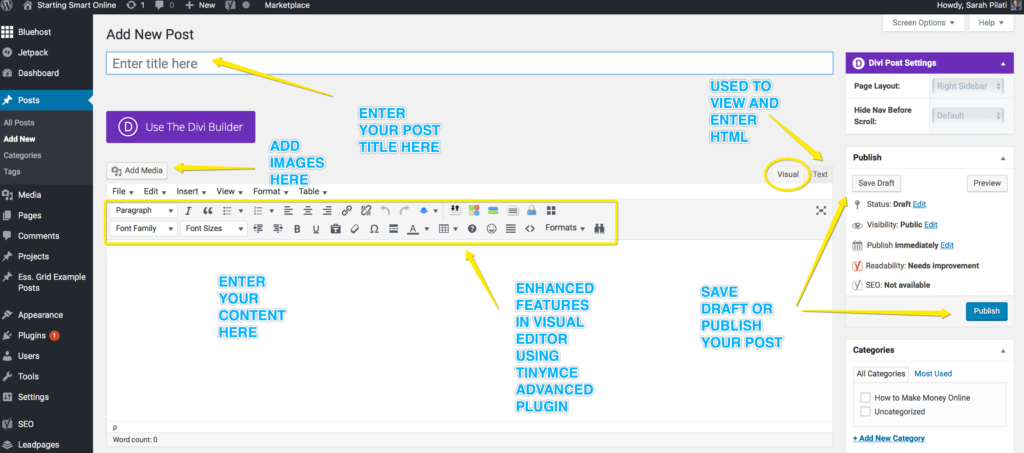
The Visual tab is where you view what your content will look like. The Text tab is where you see the code that is used to create the style of your content. Here is a snapshot of the Visual tab.
This is what the Text tab looks like for the same content. Don’t freak out. You don’t need to worry about this for now. I’m determined to keep you at a safe distance from any coding!
You can add images to your post by clicking the Add Media button above the Visual Editor. With the Divi page builder you can add images by adding the image module instead. More on this later.
You can save your post as a draft by clicking the Save Draft button or you can go ahead and publish by clicking the Publish button.
When you view All Posts, posts that have not yet been published with show the word “Draft” under the post title.
On the right hand side of the screen you will see a Categories box. This is where you can assign your blog post to a category.
The Tags box is where you can add tags to your post if you want to. Type in your tag and then Add. Tags help people when searching your site. They are usually more specific than categories.
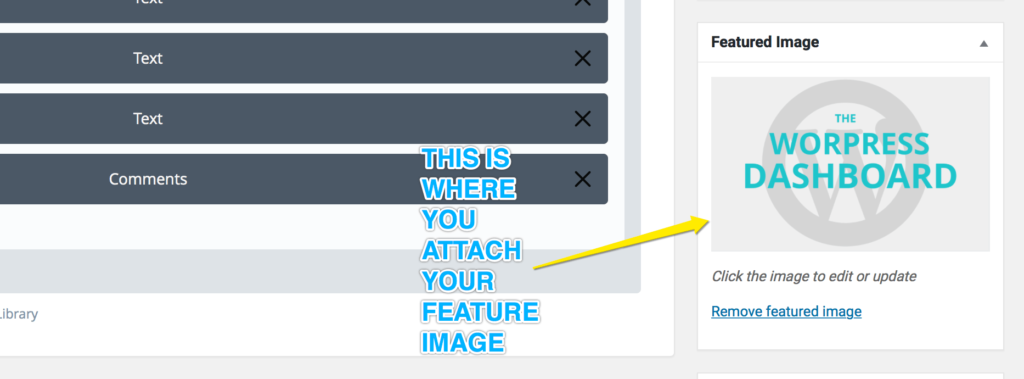
At the Featured Image box, you can add the main feature image for your post. This is different to the images that you might want to include within your content. The featured image is the image that you usually see appearing in a blog feed with the title and post excerpt. This post is a great example. The featured image at the top of this post appears in my blog feed. Check it out!
Tip: If you click on the Screen Options button at the top right of the screen, and then tick the Excerpt box, the Except field will be displayed below the visual editor. This is where you can specify your own summary of the blog post. The excerpt will appear in your blog feed. If you don’t enter anything in this box, the first text in your post will appear in the feed.

Categories
Creating a category is fairly straight forward. Decide how your categories will be structured. Will you have top level categories and sub categories? Enter the name of your category. Use the Parent option to assign sub categories to parent categories. Click Add New Category when done.
Tags
Tags are words you can use to describe what your reader might find in a specific post. For example, a post might be categorised under “Vegetarian Recipes” and have tags such as “couscous” or “pumpkin”.
Here you can manage your tags (some of which you may have created straight from the Add Post screen) and you can also create new Tags here.
This page lists your tags as well as the number of posts each tag has been assigned to. If you hover your mouse over the tag name, you have the option to Edit, Quick Edit, Delete or View.
Media
The Media section is where you upload and manage your images, videos, PDF’s and other files that you use in your blog.
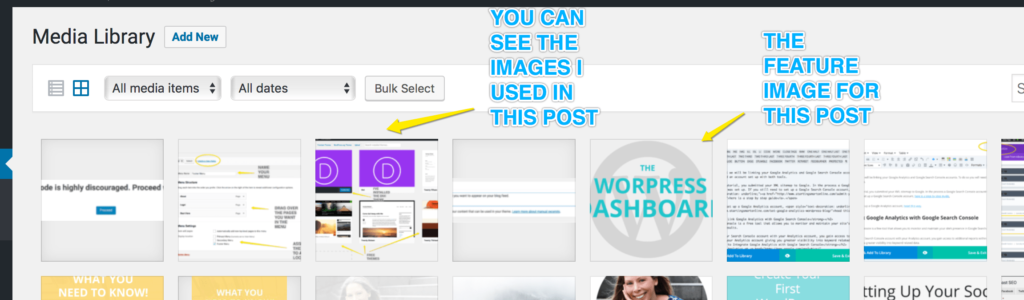
Media Library
The Media Library displays your files. When you click on a file, an Attachment Details screen appears. This is where you can see the information related to the file. You can add information to the file such as Title, Caption, Alt Text and Description.
You can also edit the image by clicking on Edit Image and delete the file by clicking on Delete Permanently.
Add New
To add a new file to your media library, click on Add New and then Select Files. Select your file from wherever it’s located. Alternatively, you can drag and drop the file.
Pages
Unlike a post, a page is static, for example the About page or Privacy page.
All Pages
Much the same as All Posts, this is where your pages are displayed. You can see the author, number of comments and the published date. Once you install the Yoast SEO plugin, you will also see a column for SEO and Readability.
If you hover over the Page Title, you will see the option to Edit, Quick Edit, Delete or View.
Add New
Create a new page here. Creating a page is very similar to creating a post but you will notice that there is no Categories or Tags box on the right hand side.
Instead you will see a box named Page Attributes. This is where you can choose a parent page for the page and assign its order in the page hierarchy. You can also assign the page to a page template.
Comments
If someone comments on your blog, this is where comments will appear. You can choose to approve the comments, mark them as spam or sent them to the trash!
You can set up your comment settings under Settings>Discussion Settings, check out the previous tutorial.
Appearance
A lot goes on in the appearance menu! We’ll cover the sub menus Themes, Customise, Widgets, Menus, Background and Editor.
Themes
This is where you install, activate and manage your themes. In the next tutorial, I’ll show you how to install the Divi theme. Here, I’ll show you how you can choose a theme from the WordPress library.
If you’re not making your way through my tutorials you’ve missed some important info on what you need to know when choosing a theme. If you want to know more, head this way.
Here you can see I have installed the Divi theme and it’s active on my website.
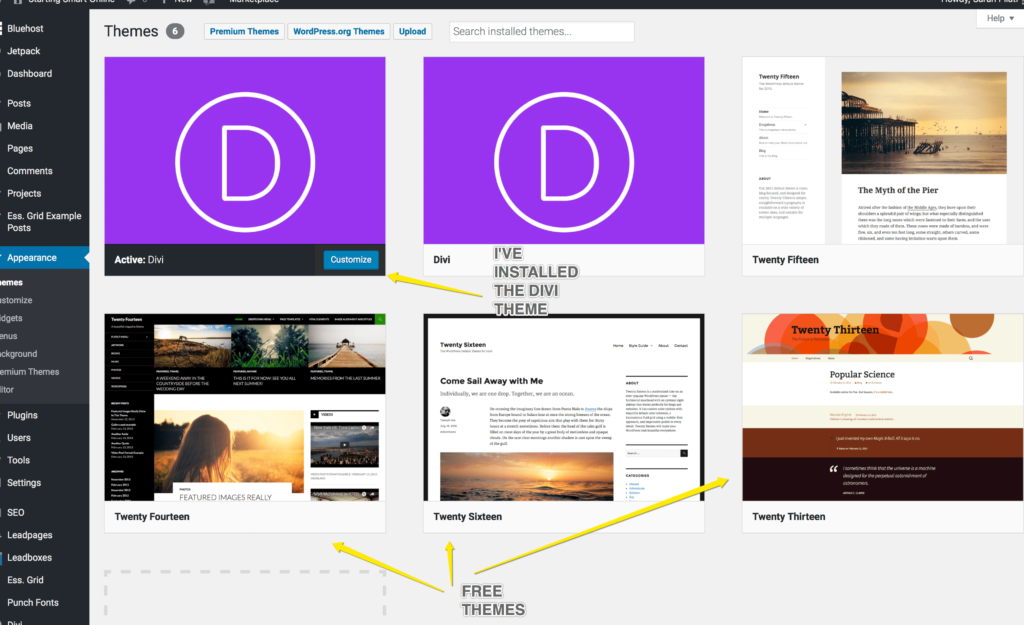
Ok, so to check out the WordPress library, click on WordPress.org Themes at the top of the screen. Here, you can search for a theme using the search bar or click on Featured, Popular, Latest, Favourites or Premium.
To install a theme, hover your mouse over the theme and an Install button will appear, go ahead and install. Once you install the theme you will need to activate it, simply by clicking the Activate button that appears.
Don’t worry, you can easily deactivate it and install another theme. If you’ve added content, it won’t be lost. You can change a theme without altering the content or health of your website.
Customise
The Customise tab is where you can adjust the settings on your website. Spend some time looking around and familiarise yourself with some of the elements of the website that you can customise.
However, the level of customisation totally depends on the theme you choose. If you choose a premium theme for example you will have way more customisation options. Learn more about choosing a theme here.
Widgets
Your content is displayed in posts and pages. But what about footers and sidebars and other areas of your site? These areas outside of your posts and pages are called widget areas. Widgets can be assigned to widget areas to allow you to display content in those areas.
If you click on Widgets, you will see on the left all the different widgets that are available for you to use. On the right, you will see the widget areas. Typically, the Sidebar and Footer Area #1, 2, 3 and 4.
You can drag the widget you want from Available Widgets over into the Widget Area that you want it to appear in.
Menus
You create and manage your menus from here.
To create a menu, click on create a new menu and then enter the name of your menu at Menu Name.
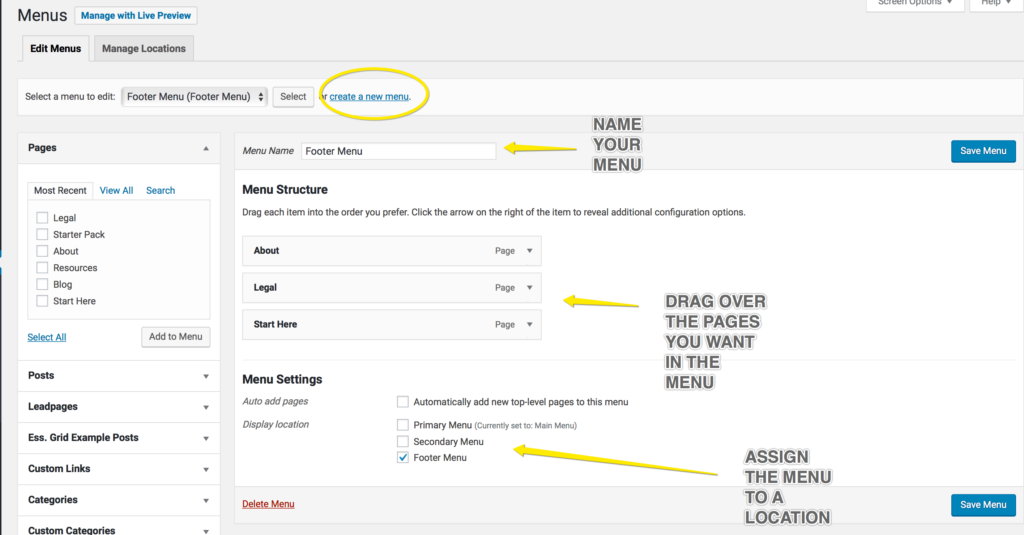
From the Pages box, you can drag the page you want in the menu over to the area under the Menu Structure.
For sub menus, simple reposition by clicking and dragging to the right, below the parent menu option.
Once you have added the pages you wish to appear in your menu over to the Menu Structure, select a Display location for the menu under Menu Settings.
Click on Save Menu.
If you have multiple menus, you can move between your menus using the drop-down menu at Select a menu to edit.
Background
The Background settings can also be found under Customise>General Settings>Background.
This is where you can choose a colour or select an image for your background.
Editor
This is where your themes template and stylesheet files are typically located. All I know is never to touch these files!!
This is Divi’s warning.

Plugins
A plugin is a piece of software that can be added to a WordPress website to extend and add to the functionality that already exists in WordPress.
For example, in the coming tutorials, we’ll be installing some awesome plugins to your new blog such as the Yoast SEO plugin. The Yoast SEO plugin handles the technical optimization of your blog and helps you to optimize your content. That’s just one example. More on plugins later.
Installed Plugins
This is where you can manage your installed plugins. This page shows you the plugins you have installed, if they are activated or deactivated and if any updates are required.
Add New
To add a new plugin you can choose the Upload a Plugin option at the top of the screen. You would do this if you have downloaded a plugin from another website. For example, we will be downloading the Monarch plugin from the Elegant Themes website in a coming tutorial for your social share and social follow buttons. This is when you would use this option.
On the other hand, you can search for a plugin from the WordPress library. This is how we install the Yoast SEO plugin – via the WordPress library. I hope that makes sense?
Editor
Once again FLASING RED LIGHTS.
Users
You can give others access to your website and manage users here. You can assign different levels of authority such as administrator, editor, author, contributor and subscriber. Here is a brief description of each role.
Administrator – can perform every task and has total access.
Editor – Editors can work with the content, managing posts and pages in the website which includes managing categories and moderating comments. They can’t alter any settings.
Author – Authors are limited to publishing, editing or deleting their own posts.
Contributor – Contributors are similar to authors in that they can edit and delete their own posts but they can’t publish them without being reviewed by the Administrator or Editor.
Subscriber – Subscribers can create a profile through your WordPress dashboard. This role is useful when someone frequently comments on a website as it can make the process easier and faster.
Tools
This tool is used to import and export content to your blog. For example, if you are moving data from another content management system such as Blogger you would use this tool. It’s unlikely you will ever need to use this function.
Settings
More on this here (too much info to squash into this post).
Great job guys! You’ve ploughed through a lot of information here.
Take a break and when you’ve replenished your mind, head over to the next tutorial where we will install the Divi theme by Elegant Themes.

You might also like…
AUTHOR: SARAH PILATI Hi, I’m Sarah! I’m here to help you create your first WordPress blog. I cover the early stages of your project – getting your website up and running! If you have any doubts you can do it yourself, this website is for you! You can get started here.
0 Comments