
This post contains affiliate links to products I use and love. Thanks for supporting me.
In this tutorial you’ll learn how to use ConvertKit and Leadpages to deliver your content upgrades from your website. I’ll be using a specific scenario which I outline below.
If want to achieve a different outcome, such as a different sequence of events or perhaps you want to publish your pages in different ways, I still recommend going through this tutorial.
It will help you to learn more about how ConvertKit, Leadpages and your website are connected and which pieces fit where. This is what I initially struggled with!
Scenario
This is the scenario that I will be using:
- Person clicks on a link in your website and a Leadbox opens up.
- Person enters their name and email address into the Leadbox and is redirected to a Leadpage, in this case a Thank You page. The Leadpage will be published via Leadpages.net, in other words the URL will be something like https://sample.leadpages.co/example (where ‘sample’ is the account name/subdomain that you selected when you created your Leadpages account).
- An email then arrives to that person’s inbox with a link to a lead magnet such as a PDF file. This same link activates confirmation of subscription simultaneously.
- Once the person clicks the link in the email, the lead magnet is downloaded.
- Clicking this link confirms subscription which then triggers an email sequence that has been set up in ConverKit. The second email (which is the first email in your sequence) is then sent to the subscriber. In this tutorial the first email in the sequence will be sent immediately after the person activates confirmation by clicking on the link in the first email.
This video shows the sequence of events.
It can be a little confusing at first, hopefully this diagram helps show how everything connects and where each piece fits in.
How ConvertKit, Leadpages and Your Website Fit Together in This Scenario

Step 1 – Create a Lead Magnet
Create your lead magnet to deliver to your subscribers once they opt in. This could be a PDF, video, MP3 etc.
Step 2 – Create a Thank You Page in Leadpages
The next step is to create your Thank You page. When someone opts in via your Leadbox, this is where they will be redirected to.
Login to your Leadpages account. Make sure you are in the Leadpages tab and click on Create New Page.

Now you are in the Templates tab where you can select a template from either the Standard Builder or the Drag & Drop Builder. In the search bar to the right, you can look for any type of page.
If you are using my scenario here, type in “Thank You”. To find a suitable Thank You page, take a look at the options in both the Standard and Drag & Drop template libraries.

Once you have chosen a template, make the necessary changes and then click on Publish.
In the Leadpages tab under the question “Where would you like to publish this page?” Leadpages provides you with a URL that you can start using immediately.

Take note – this URL will be inserted into your Form Incentive email in ConvertKit.
Step 3 – Create a Sequence in ConvertKit
In this tutorial, we will only be including one email in the email sequence.
The first email in the email sequence is not the first email the subscriber receives. The first email to be received is the confirmation email which is set up under Forms, not Sequence.
You will need to have your email material ready to go. Otherwise you can just create a test email to see how the process works, and create your email content later.
Login to your ConvertKit account. Click on Sequences in the top menu and then click on +Create Sequence. Name your Sequence.

Enter your Email Subject and Email Content.
To personalize the email, select the Personalize drop down menu and choose an option. ConverKit will automatically add the code. You can tweak the text if you like.
For example, you could change “Hi there” to “Hello” or whatever you prefer.
Change the Status to Published.
In this scenario, the first email in the sequence is received at the same time as the confirmation email. To do this, you need to make the Delay Sending By option “0” days.
Finally, click on Save All.
Step 4 – Create a Form in ConvertKit
The “Form” is where you will create the content for your confirmation email, attach a link to your lead magnet and redirect the subscriber to your Thank You page.
Click on Forms in the top menu and then click on +Create Form.
You are then asked “How do you want to gather subscribers?”. Choose A form.
Important: The fields you choose here must match the fields in the Leadbox we will be creating shortly.

If you want to replicate this scenario, choose the simple form with the First Name and Email address fields.
Now click on Settings.

In the Main Settings you can name your Form.
Check the Redirect to another page option as shown below, and enter the URL for your Leadpages Thank You page that you established in Step 1.
Under Sequence Settings, select the sequence that you set up in Step 3.
In this scenario, I’ve made the sequence mandatory for all new subscribers.

Once you have completed the Main Settings, select the next tab down, Incentive Email.

Enter the Subject and the content of your confirmation email here.
You can change the text in the link button if you like. You can upload your lead magnet by checking the Incentive download option and then uploading your file. Save.
Form Code
Next you need to get the Form Code to insert into your Leadbox in Step 5.
To do this, click on the Embed tab and then select the RAW HTML option.
Copy and paste this HTML code into a Word document or similar so you have the code for Step 5, or just keep your screen open to return to later on.

Important: A bit of extra code needs to be manually added to the Raw HTML code you have just copied and pasted into your Word doc. Look through the code and you will see a piece of code that looks like the extract below. After the word “subscribe” at the end of the extract add “.html”. See the second snippet which shows how the code should now look.
Before: <form id=”ck_subscribe_form” class=”ck_subscribe_form” action=”https://app.convertkit.com/landing_pages/114480/subscribe” data-remote=”true”>
After: <form id=”ck_subscribe_form” class=”ck_subscribe_form” action=”https://app.convertkit.com/landing_pages/114480/subscribe.html” data-remote=”true”>
Now you’ve created your first email – the confirmation email, with a link to your download + the first email in your email sequence that will arrive at the same time as your confirmation email.
Step 5 – Create a Leadbox and Add the Form Code
Nearly there! Now we are going to create a Leadbox in Leadpages using the Standard Builder.
Jump back into your Leadpages account and this time, select Leadboxes in the top menu and then click on Create New Leadbox.

Under Integrate Settings select the dropdown menu and choose Other.

In the box named HTML Code that appears below, place the HTML code you copied from your Form in Step 4.
Remember to add the extra bit of code as noted in Step 4.
Customize and design your Leadbox.
Make sure the Captcha 2 H and Course_opted fields are unchecked if you want to replicate this scenario.

When you have your Leadbox ready, click on Save in the top right corner and then Publish.

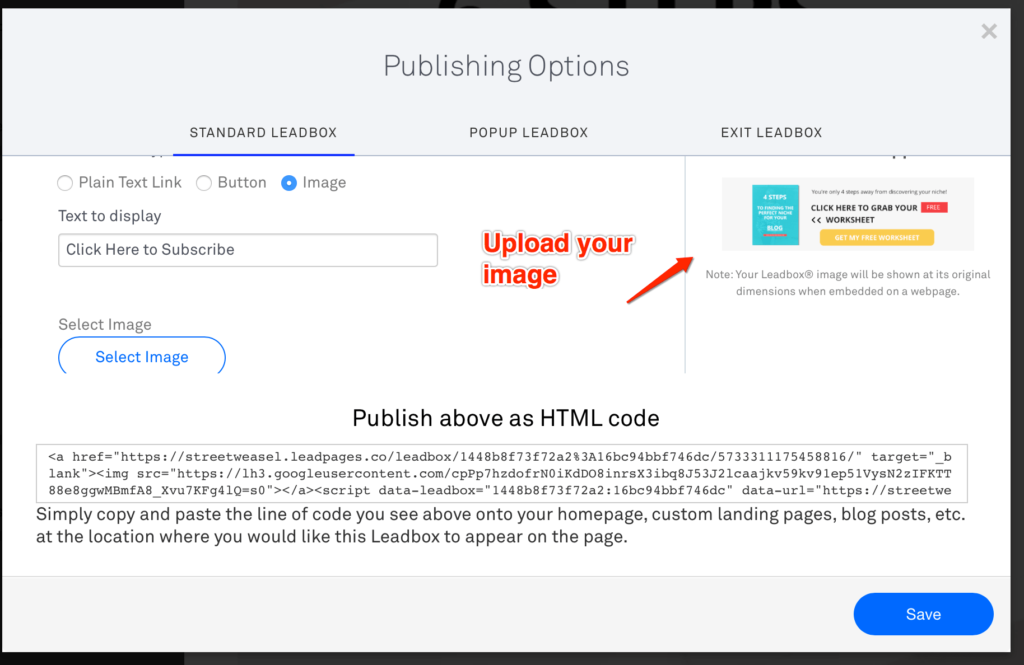
In Publishing Options, I’ve chosen a Standard Leadbox. This Leadbox type, has three options for publishing: Plain Text Link, Button and Image.
Choose the link type you want to use and copy the code that appears in the box below.
Depending on how you want the Leadbox to appear, you may only need a snippet of the code. If this is the case, you will need to paste the code into a Word doc or similar first.
See the next step.
Step 6 – Add the Leadbox Code to Your Website
Adding a Plain Text Link
A plain text link will look something like this!

To add a Plain Text Link, select the Plain Text Link option under the Standard Leadbox tab in Publishing Options. Copy and paste the HTML code from the lower box. Enter the code into the Text editor (not the Visual editor) of your WordPress post or page.
Adding a Button Link
The button will appear as shown in Publishing Options.
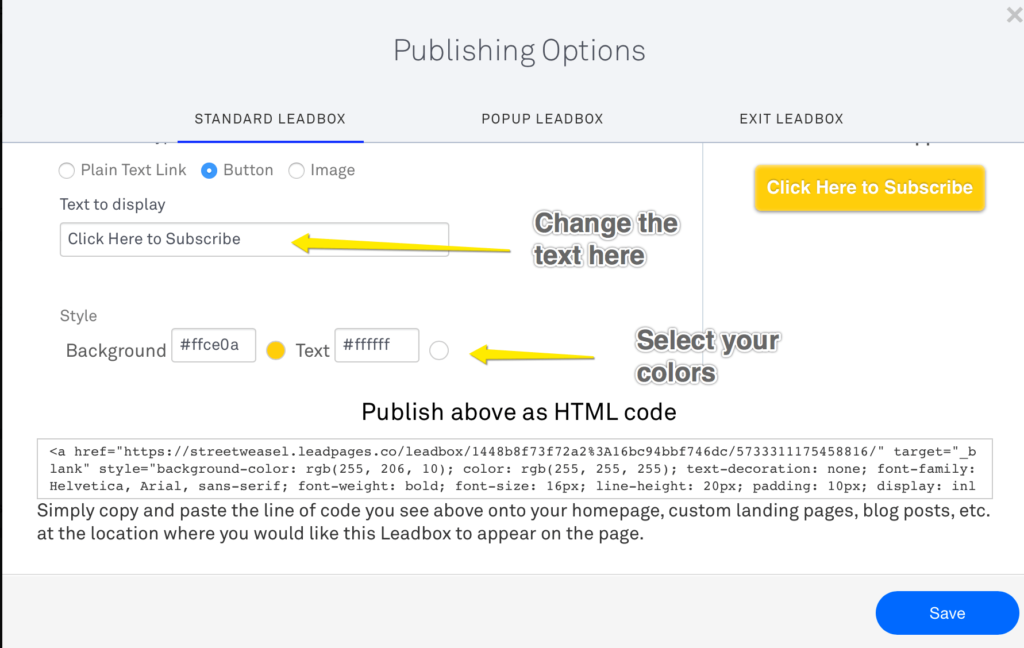
To add a Button Link, select the Button option under the Standard Leadbox tab in Publishing Options. Copy and paste the HTML code from the lower box. Enter the code into the Text editor (not the Visual editor) of your WordPress post or page.
Adding an Image Link
To add an Image Link, select the Image option under the Standard Leadbox tab in Publishing Options. Upload your image file. Copy and paste the HTML code from the lower box. Enter the code into the Text editor (not the Visual editor) of your WordPress post or page.
Adding a Link to a Menu Option
Firstly, select the Plain Text Link option under the Standard Leadbox tab in Publishing Options. Copy and paste the HTML code from the lower box and paste into a text editor eg: Word doc.
Select only the URL of the Leadbox from the block of code as shown below.
Example:
<a href=”https://example.leadpages.co/leadbox/23432423472a2%3A16bc94bbf746dc/573331117545345816/” target=”_blank” style=”background-color: rgb(255, 206, 10); color: rgb(255, 255, 255); text-decoration: none; font-family: Helvetica, Arial, sans-serif; font-weight: bold; font-size: 16px; line-height: 20px; padding: 10px; display: inline-block; max-width: 300px; border-top-left-radius: 5px; border-top-right-radius: 5px; border-bottom-right-radius: 5px; border-bottom-left-radius: 5px; text-shadow: rgba(0, 0, 0, 0.247059) 0px -1px 1px; box-shadow: rgba(255, 255, 255, 0.498039) 0px 1px 3px inset, rgba(0, 0, 0, 0.434039) 0px 1px 3px; background-position: initial initial; background-repeat: initial initial;”>Click Here to Subscribe</a><script data-leadbox=”1448b8543f72a2:16bc94bbf746dc” data-url=”https://example.leadpages.co/leadbox/1448b8f73f72a2%3A16bc94bbf746dc/5733311175458816/” data-config=”%7B%7D” type=”text/javascript” src=”https://example.leadpages.co/leadbox-1473459620.js”></script>
In your WordPress dashboard, click on Appearance>>Menus and select Custom Links.
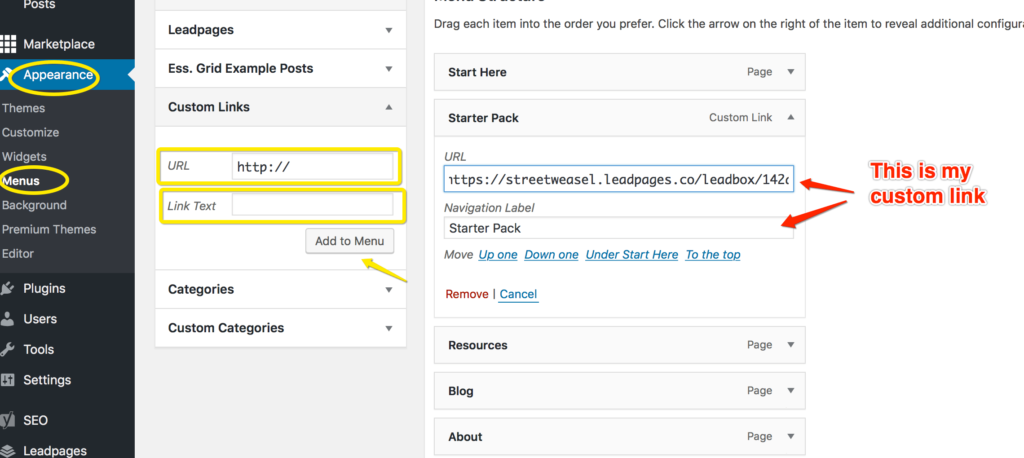
Enter the URL from your block of code and then the Link Text and Add to Menu.
To make sure you still have the overlay effect you can do a couple of things (without the overlay effect the Leadbox will appear on a black screen, rather than showing your website greyed out behind the Leadbox).
You will need the code between the script tag. For example:
<script data-leadbox=”1448b8543f72a2:16bc94bbf746dc” data-url=”https://example.leadpages.co/leadbox/1448b8f73f72a2%3A16bc94bbf746dc/5733311175458816/” data-config=”%7B%7D” type=”text/javascript” src=”https://example.leadpages.co/leadbox-1473459620.js”></script>
- You can create a text widget. Add the code to the widget, leaving the Title field empty. Place the widget in a widget area.
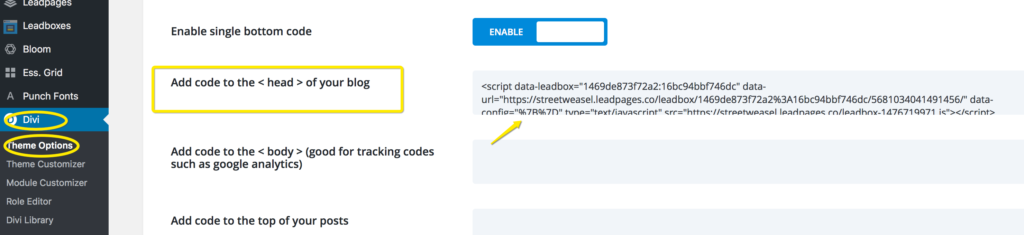
- For those using Divi themes, you can go to Divi>>Theme Options, select the Integration tab in the purple menu bar, and add the code to the <head> of your blog.
Run Testing
Everything is now set up! Hopefully that wasn’t too hard and all made sense.
The next very important step is to test everything works. Opt in to your Leadbox with a test email address and check the steps that occur after you opt in match the sequence outlined at the beginning of the post
If you run into any trouble, let me know and I’ll do my best to help you out!


AUTHOR: SARAH PILATI Hi, I’m Sarah! I’m here to help you create your first WordPress blog. I cover the early stages of your project – getting your website up and running! If you have any doubts you can do it yourself, this website is for you! You can get started here.


0 Comments